
Lightweight Backpacking and Photography
Lightweight options when hiking and backpacking are widely debated, and there is certainly a difference between what would be taken on a typical day hike vs what would be taken on an overnight / multiple-overnight backpacking trip. For this post, I will discuss an evolution of approaches to lighter-weight options and how traveling light is actually much safer than carrying unnecessary gear.
First of all, I must clarify what I mean by multi-day backpacking. For this, I am assuming backpacking on trails for the purposes of accessing remote areas of the backcountry. I am not including in my scope, off-trail scrambling, cross-country trekking, and certainly not technical climbing that requires additional gear for protection and safe travel.
My first exposure to multi-day backpacking was actually in the Army. In those days, I did training for multi-day trips carrying an external frame backpack (rucksack) with the most heavy an inefficient gear one can imagine. It was not uncommon to trek with a 50 or 60 pound pack and assume that to be “normal”. Let me assure you, there is nothing pleasant about carrying that much weight – especially when one looks to cover 10, 15, 20 or more miles per day… and to do this multiple days in a row.
My backpacking journey has evolved since that time. In the early 2000’s, I used backpacking – in addition to climbing – to aid in glacier and alpine climbing routes in the Cascades. This approach to “backpacking” lasted until roughly 2008 – when I began to transition my interest away from technical climbing as the primary reason for backcountry travel.
Over the past year, I have been evolving my backpacking and photography gear to balance efficiency and function. I completed the Wonderland Trail – a 93 mile circuit around Mount Rainier National Park – in September of 2017. During this trip, I learned a great deal about the balance of the function of lightweight gear, but I was not able to really integrate any of my professional-level photography equipment into the trip. I actually took a Nikon B700 point and shoot, super-zoom camera with me.
My basic approach to backpacking gear is to prioritize / optimize weight and function. In addition, if gear can serve multiple functions, then additional weight reductions can be achieved. I will first discuss my standard gear for backpacking, and then I will summarize what photography gear I choose and how my kit has evolved over the past two years. At the end of the article, I have included (and linked to a printable PDF) a general backpacking checklist. I like to use this on every trip to ensure that all critical items are included. I have a customized version that is just for myself.
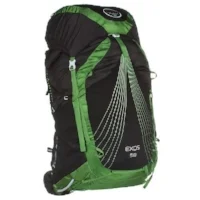
Backpack: Either the Osprey EXOS 58 (2017) or Osprey Atmos 65 (2018). Depending on the trip itinerary and load requirements, I will go with one of these two backpacks. The EXOS 58 is an ultralight and fully functional pack that doesn’t sacrifice comfort for weight. The Atmos 65 is a little larger and would be my pick if there were anticipated “off trail” hiking.

Tent: Big Agnes Copper Spur UL 1 for single / UL 2 for double occupancy. This tent (the UL1) weighs in at 2lbs 2oz, so it is one of the lightest freestanding 3-season tents available. The Fly Creek is a few ounces lighter, but I MUCH prefer the side entrance and vestibule system on the Copper Spur.

Sleeping Bag: Feathered Friends Flicker 30 UL Quilt Style Sleeping Bag. This bag weighs in at 1 lb 7 oz, and contains Pertex fabric to resist water and moisture. A quilt style bag can be unzipped completely for those warm summer nights, and when the weather turns cool the footbox can be cinched and the bag zipped like a traditional sleeping bag. I found this bag to be perfect for summer outings – for early spring or late fall, I may opt to bring a bag rated to 15 or 20 degrees F.

** Prior to my intent to really analyze and reduce my pack weight in preparation for the Wonderland Trail, I used a Gregory Pack, a Mountain Hardwear Tent, and a North Face Sleeping Bag. With the EXOS 58, UL1, and Flicker 30, I have cut over 4 lbs from my pack weight in just these three items.
For other equipment, I have also made a deliberate attempt to reduce and control weight. On most summer outings, I will take the MSR Pocket Rocket stove kit – including the 0.75 liter aluminum pot. For more capability in higher elevations or where I expect to deal with wind, I will take the JetBoil Flash or MSR Windburner. These are all lightweight options, but the Pocket Rocket is the lightest and most compact. For a sleeping pad, I use the ThermaRest Neo Air.


I have included the checklist below as a general guide to what equipment is necessary in the backcountry. This includes 10 Essentials / 10 Essential Systems recommended by The Mountaineers and contained in Mountaineering: The Freedom of the Hills.

Additionally, I am including a full generic checklist that includes items taken on a typical backpacking trip. The 10 Essentials / 10 Essential Systems are included in this comprehensive list. I would encourage everyone to develop their own customized list that is specific to what you require and what you would take on your own backpacking adventure.

Photography System:
Switching camera systems for the purpose of reducing weight and bulk is an expensive proposition. Especially combined with the prospect of learning a potentially new menu system and investing in not only the body – but potentially an entire new ecosystem of expensive lenses. The items discussed above can reduce considerable weight and may prove to be adequate for an individual’s weight reduction goals. However, if you are still thinking about potentially switching camera systems, below is a brief summary of my thought processes and the gear that I selected.
My interest in a lighter-weight solution was driven by my completion of the Wonderland Trail in September 2017. I was not able to take what I would consider an adequate camera system with me because I was very worried about the weight impact. While I did have an amazing experience hiking the Wonderland Trail, I wasn’t able to gain the photography experience that I otherwise would have had. This issue continued to bother me through the first half of 2018 as I debated on the best option. My Canon 5D MK IV and associated L Lenses was only 2 years old at the time. It wasn’t until “weighing” options for a photography expedition I was taking in September that I finally made the decision.
In July 2018, I purchased a Sony A7RIII and some associated native Sony glass. My system is below:
Sony A7RIII
Sony 16-35 f/2.8 GM
Sony 24-70 f/2.8 GM
Sony 70-300 f/4.5-5.6 G
Sony Sonnar T* FE 55mm f/1.8 ZA
I also have the following filters from Breakthrough Photography:
Z-100 Holder
Magnetic CPL
2 & 3 Stop Hard Edge ND Grad
2 & 3 Stop Soft Edge ND Grad
10 Stop ND Filter
6 Stop ND Filter
- housed in ThinkTank Filter Hive
For a typical backpacking trip, I will usually always take the 16-35 and the 70-300. I opted for the f/2.8 version as there is only 5.7 oz difference and the GM lens is a much sharper lens (although the f/4.0 version is also very good). The 70-300 is an excellent balance for a telephoto, and it is a whopping 20 oz lighter than the 100-400 GM (although not the lens as the latter). Sometimes, I will supplement the 55mm Prime – which is an excellent and super-sharp lens weighing only 9.9 oz.
For those thinking of or considering a switch to a lighter-weight system, I highly recommend Matt Payne’s Sony Gear Selection Tool. It enables you to choose a selection of gear from Sony, Canon and Nikon and immediately see sharpness, weight, and cost.